After asking a quilt list and my followers here about a pattern I came up with, no one seems to recognize it as a published pattern. What follows is a tutorial for Viridian's Chain, a 10 inch block:

With sashing and cornerstones that connect the chains. Here is what the quilt top looks like on my 'design floor', 5 by 6 blocks, without borders:

Here we go.
Pick two colors, color A and color B, to be your chain fabrics. It can be scrappy, but the fabrics should be quite similar. I used 1800's reproduction fabrics (a favorite) and red and navy blue as my color A and color B. Different choices will make the chain 'pop' more.
For each block, you need: 2 3.5 inch squares of color A, 2 3.5 inch squares of color B, 2 2.5 inch squares of color A, 2 2.5 inch squares of color B, and 12 2.5 inch squares of coordinating scrap fabrics.

Sew the central 4 patch squares together. Press to one side to help nest those central seams. I pressed towards the blue fabrics.
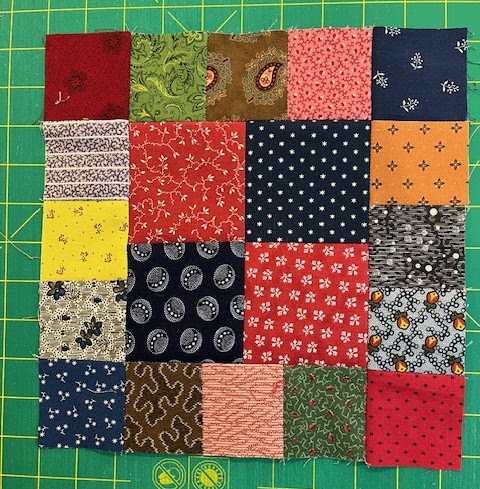
Sew the coordinating scrap fabrics together in groups of three. Press seams to either side or open, your choice. Lay out your patches as in the photo below.

Important: The direction of the chain of color A and color B fabrics is going to be the same in each block. In my case, navy blue fabrics run from lower left to upper right in EACH block.
Sew a group of three scrap fabrics to the top and bottom of the block. Sew color A and color B 2.5 inch squares to the ends of the other group of three 2.5 inch squares.

Sew the sides pieces onto the center piece. Press the seams inward or outward. I pressed out to the strip of 5 square pieces.
You now have one block.
Setting with sashing and cornerstones:
Cut sashing pieces 2.5 inches wide by 10.5 inches long. For 5 by 6 blocks, I calculate 71 sashing pieces, and you will need at least a yard of sashing fabric, maybe 1.5 yards.
Cornerstones: From color A and color B cut 1.5 inch strips of fabric, sew one of color A to one of color B. Press to one side (in my case to the navy blue). Cut off pairs at 1.5 inches wide. Or you could cut individual squares at 1.5 inches square.

You need to have cornerstone blocks that finish at 2 inches square, and by my calculations, for a set of 5 by 6 blocks you will need 42 cornerstone blocks.
Set the sashing strips and the cornerstone blocks in the proper orientation.

Note the orientation of the cornerstone block, how it continues the chain of color A and color B. I sewed a sashing strip to the right side of each block first. Press towards the sashing fabric. Then I sewed a cornerstone block to a sashing strip, and added it to the top of the block. Press seams towards the sashing here too. All cornerstone blocks are in the same orientation (no rotations!). When you set the blocks together, keep the same orientation - that is, the same color runs from lower left to upper right.
When you set the blocks together in rows and columns all sashing will be in place, except for the bottom and left-hand side of the quilt. You will have to add these - watching for the orientation of that cornerstone block.
Here are two blocks together:

And four blocks together:

This group of four blocks became the lower left corner of my quilt top. Note how the cornerstone blocks are all in the same orientation. And how the chains of color A and color B are oriented.
The whole quilt top, again:

The size of the top now is 62 inches by 74 inches. I am adding borders of the red fabric first, 1.5 inches wide, finished. Then borders of a blue fabric, 3 inches wide, finished. I wish it could be a little wider but I am limited by what I have in my stash - I didn't want to buy any more fabric.
I will update this blog entry with a photo of the border, once I get there!
Edited Monday evening: Here is a corner of the finished top. with red and blue borders:

Linking up with Monday Musings, Sew and Tell at Melva Loves Scraps, Wednesday Wait Loss, Needle and Thread Thursday, Put your Foot Down at the Quiltery, Nina-Marie, Finished or Not at Alycia Quilts, From Bolt to Beauty, Oh Scrap at Quilting is more Fun than Housework.
I have a page on Facebook: keep up with my infrequent quilt and stamp posts at https://www.facebook.com/pages/Viridian61/347674418583948?ref=hl
Viridian

8 comments:
Makes such a pretty top - thank you SO much! If I lived nearby, I'd bring you some homemade cookies. :)
This is great. Thanks :)
Thanks. I think I am going to try this one!
This is a great scrappy block! Thanks for the tutorial!
Great block, pretty quilt! Thanks for sharing on my weekly show and tell, Wednesday Wait Loss.
https://www.inquiringquilter.com/questions/2025/06/25/wednesday-wait-loss-438
Thank you for taking the time to write a tutorial for this scrappy block! Many blocks sure turn into a beautiful top!
I love your quilt and your block is great. Thanks for the tutorial! Thanks for sharing with us at Monday Musings!
thanks for the tute!!! that will be a cool way to use scraps!!
Post a Comment